Host Your Own Pastebin
By Eeshaan K. B. and Prithvi Vishak
Created May 3rd, 2022
If you're like us and host your own IRC server for chatting, you'd probably like some kind of pastebin facility. Yes, Imgur and Mediafire and whatnot exist, but you'd probably prefer hosting it yourself. Enter SIPB, the Simple Image PasteBin, a pastebin that you can host yourself (it's kind of a misnomer; it's not just limited to images).
SIPB has a (very) simple web interface from which users can upload and view files. The server backend is written in Go. The entire codebase is less than 1000 lines, and obviously, free and open-source. Your own instance of SIPB is a few simple steps away.

Behold the pinnacle of web design
Getting and Building
Everything needed for SIPB is containerized.
Install git, docker, and docker-compose on your server with your package manager. Create a folder for SIPB, then clone the repository with the code. Also create a folder for uploaded files to reside.
It is recommended to keep the folder with the uploaded files outside the folder containing the code, to prevent Docker from copying all those files while building the container.
mkdir pastebin && cd pastebin
git clone https://github.com/yac-d/sipb.git
mkdir files
Next, create docker-compose.yml with the following contents:
version:  "3"

services:
  sipb:
    image: 'sipb:latest'
    container_name: 'sipb'
    restart: unless-stopped
    build:
      context: ${PWD}/sipb
      dockerfile: ${PWD}/sipb/Dockerfile
    ports:
      - "8080:80"
    volumes:
      - "./files:/var/www/bin"
Finally, build and start the container with docker-compose up -d --build. That's it! Launch a browser, and head to http://your-server-ip:8080/pastebin.
If it doesn't work, you may need to open port 8080 in your server's firewall.
To update SIPB in the future, just pull the latest code and rebuild your container.
cd pastebin/sipb
git pull
cd ..
docker-compose up -d --build
Configuring
SIPB first reads its configuration from /etc/config.yaml in the container (server/config.yaml.docker in the repository).
These values can be overriden by environment variables, if set. It is recommended to set configuration with environment variables, so that there is no need to jimmy in a separate config file or rebuild the container every time you change something.
To change the maximum file size to 2GB, add the following to your docker-compose.yml under sipb:
environment:
  - "SIPB_MAX_FILE_SIZE=2000000000"
For all configuration options, see this.
Securing and Deploying
SIPB has no security features of its own, as we thought it was best left to more mature programs. We'll be going through adding HTTP basic authentication and SSL/TLS for HTTPS.
To do this, We're going to use Nginx Proxy Manager to set up Nginx as a reverse proxy.
Add the following to your docker-compose.yml under services:
  proxy:
    image: 'jc21/nginx-proxy-manager:latest'
    container_name: 'proxy'
    restart: unless-stopped
    ports:
      - "81:81"
      - "80:80"
      - "443:443"
    volumes:
      - ./proxydata:/data
      - ${PWD}/secrets:/etc/mysecrets
HTTP Basic Authentication
HTTP basic authentication provides a simple username/password barrier. At present, it is assumed that you trust everyone you share the username and password with, as there is no system of accounts and permissions.
Install the htpasswd tool (usually provided by packages like httpd-tools or apache2-utils). Next, create a folder to hold your secret files. Here, create a password file.
Replace username with your preferred username, and respond to the password prompts.
mkdir secrets && cd secrets
htpasswd -c htpasswd username
Navigate back up to your folder with the compose file and run docker-compose up -d to start Nginx Proxy Manager.
Then, launch a browser and go to http://your-server-ip:81/. Enter the default credentials admin@example.com with password changeme. Go through the user creation.
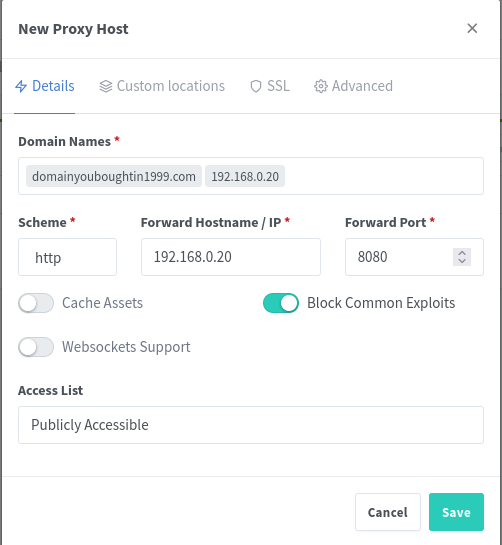
Create a proxy host by going to Hosts->Proxy Hosts and hitting "Add Proxy Host".
Fill in domain name as necessary. You may want to add your server's IP as a second domain name. Set "Scheme" to http, "Forward Hostname" to your server's IP, and port to 8080 as we had configured above.
Hit "Save", then go to your domain/server IP on port 80. If you see SIPB, things are working as they should.

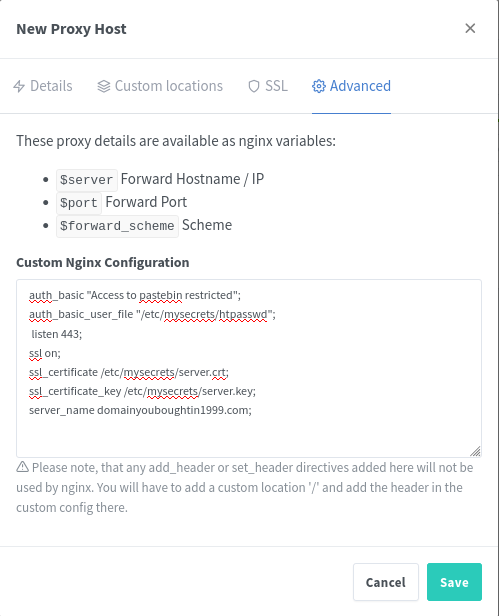
To add HTTP basic auth, edit the proxy host you just created. Navigate to the "Advanced" tab, and in the "Custom Nginx Configuration" box, add the following lines:
auth_basic "Access to pastebin restricted";
auth_basic_user_file "/etc/mysecrets/htpasswd";
Go to your server on port 80 again. You should get a password prompt. Enter the username and password you set in the htpasswd file earlier. Hooray. You now have HTTP basic auth.
Thank you, docs.
HTTPS
Obtain SSL certificates for your domain from a CA. We're not going to go into how to do that here. That's its own world of pain everyone must at one point go through alone.
Nginx Proxy Manager seems to allow you to request certificates from LetsEncrypt directly from the web interface.
We've personally never tried this, but we do know that you need to have your pastebin exposed on port 80 publicly (forwarded on your router), and that you cannot set your server's local IP as a hostname in Nginx Proxy Manager (for obvious reasons).
Here, we're assuming you have your certs already. We're going to refer to them as server.crt, server.key, and ca_bundle.crt.
Copy them to your secrets folder as you did with htpasswd. Append the contents of ca_bundle.crt to server.crt.
cat ca_bundle.crt >> server.crtNavigate back to the proxy host you made in Nginx Proxy Manager. Add the following lines below your HTTP basic auth configuration:
listen 443;
ssl on;
ssl_certificate /etc/mysecrets/server.crt;
ssl_certificate_key /etc/mysecrets/server.key;
server_name your-domain.com;
Yeah, you could have just done this with regular old Nginx and a config file, but this is prettier
Hitting "Save" ought to do it. Ensure your server and router have the appropriate ports open and forwarded respectively. Enjoy!
Thanks again, docs.
Final State
Your filesystem should look something like this:
pastebin
├── files
│   ├── 12412452345_Your Arch user friend's daily screenshot.png
│   └── 12412352455_Your Arch user friend's daily screenshot.png
├── data
│   └── ... Just Nginx Proxy Manager stuff
├── docker-compose.yml
├── sipb
│   ├── assets
│   ├── Dockerfile
│   ├── LICENSE
│   ├── README.md
│   ├── server
│   └── webpages
└── secrets
    ├── ca_bundle.crt
    ├── htpasswd
    ├── server.crt
    └── server.key
Your docker-compose.yml should look something like this:
version:  "3"

services:
  sipb:
    image: 'sipb:latest'
    container_name: 'sipb'
    restart: unless-stopped
    build:
      context: ${PWD}/repo
      dockerfile: ${PWD}/repo/Dockerfile
    ports:
      - "8080:80"
    volumes:
      - "./bin:/var/www/bin"

  proxy:
    image: 'jc21/nginx-proxy-manager:latest'
    container_name: 'proxy'
    restart: unless-stopped
    ports:
      - "81:81"
      - "80:80"
      - "443:443"
    volumes:
      - ./data:/data
      - ${PWD}/secrets:/etc/mysecrets